↓↓クリックして頂けると励みになります。
【04 | Bootstrap5.3の利用】 << 【ホーム】 >> 【06 | ナビゲーションバーの利用】
Ruby on Railsでログインを実装する時、「device」を活用すると素早く実装することができます。
deviseはユーザーの登録、ログイン、ログアウト、パスワードリセットなどの認証機能があり、Gメールの設定をすることで、セキュリティが向上します。
バージョン4.8をGemFileに記述します。
記述追記 【Gemfile】
gem 'devise', '~> 4.8', '>= 4.8.1'
バンドルします。
前のセッションで「gem 'sassc-rails', '~> 2.1', '>= 2.1.2'」を入れていますが、これがないとエラーが出ます。
入れていない方はGemfileに追加してください。
コマンド
bundle
デバイスをインストールします。
コマンド
rails g devise:install
次のようなインフォメーションがでますので、その流れに沿って進めていきます。
===============================================================================

Depending on your application's configuration some manual setup may be required:

  1. Ensure you have defined default url options in your environments files. Here
     is an example of default_url_options appropriate for a development environment
     in config/environments/development.rb:

       config.action_mailer.default_url_options = { host: 'localhost', port: 3000 }

     In production, :host should be set to the actual host of your application.

     * Required for all applications. *

  2. Ensure you have defined root_url to *something* in your config/routes.rb.
     For example:

       root to: "home#index"

     * Not required for API-only Applications *

  3. Ensure you have flash messages in app/views/layouts/application.html.erb.
     For example:

       <p class="notice"><%= notice %></p>
       <p class="alert"><%= alert %></p>

     * Not required for API-only Applications *

  4. You can copy Devise views (for customization) to your app by running:

       rails g devise:views

     * Not required *

===============================================================================
まず、ユーザーテーブルを作ります。
コマンド
rails g devise user

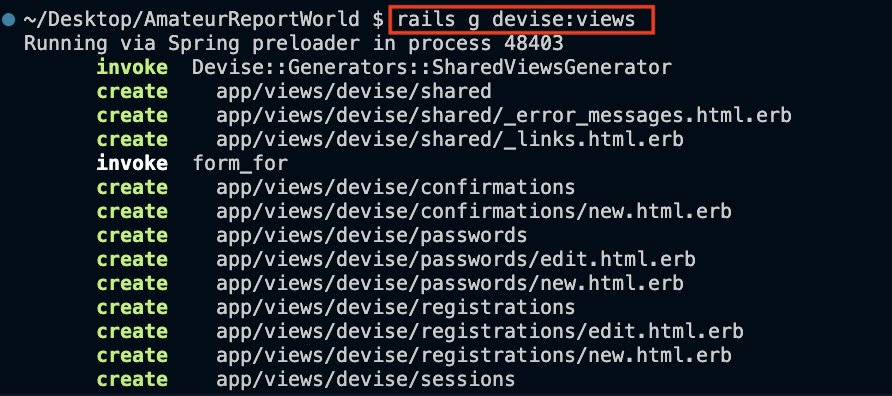
ビューを作成します。
コマンド
rails g devise:views

マイグレーションを適用します。
コマンド
rails db:migrate
Rails7になってからエラーがdeviceで発生するようになりました。
エラーの内容は「undefined method user_url」です。
これを回避するために「config/initializers/devise.rb」ファイルの266行目config.navigational_formats = ['*/*', :html, :turbo_stream]のコメントアウトを解除します。
コメントアウト解除 【config/initializers/devise.rb】266行目
config.navigational_formats = ['*/*', :html, :turbo_stream]
メールが送れるように設定します。
これは開発環境での設定になります。
「config\environments\development.rb」ファイルの末尾に以下の記述を追加します。
  # デバイスのメール設定
  config.action_mailer.default_url_options = { host: 'localhost', port: 3000 }
記述追加 【config\environments\development.rb】78行目
require "active_support/core_ext/integer/time"

Rails.application.configure do
  # Settings specified here will take precedence over those in config/application.rb.

  # In the development environment your application's code is reloaded any time
  # it changes. This slows down response time but is perfect for development
  # since you don't have to restart the web server when you make code changes.
  config.enable_reloading = true

  # Do not eager load code on boot.
  config.eager_load = false

  # Show full error reports.
  config.consider_all_requests_local = true

  # Enable server timing
  config.server_timing = true

  # Enable/disable caching. By default caching is disabled.
  # Run rails dev:cache to toggle caching.
  if Rails.root.join("tmp/caching-dev.txt").exist?
    config.action_controller.perform_caching = true
    config.action_controller.enable_fragment_cache_logging = true

    config.cache_store = :memory_store
    config.public_file_server.headers = {
      "Cache-Control" => "public, max-age=#{2.days.to_i}"
    }
  else
    config.action_controller.perform_caching = false

    config.cache_store = :null_store
  end

  # Store uploaded files on the local file system (see config/storage.yml for options).
  config.active_storage.service = :local

  # Don't care if the mailer can't send.
  config.action_mailer.raise_delivery_errors = false

  config.action_mailer.perform_caching = false

  # Print deprecation notices to the Rails logger.
  config.active_support.deprecation = :log

  # Raise exceptions for disallowed deprecations.
  config.active_support.disallowed_deprecation = :raise

  # Tell Active Support which deprecation messages to disallow.
  config.active_support.disallowed_deprecation_warnings = []

  # Raise an error on page load if there are pending migrations.
  config.active_record.migration_error = :page_load

  # Highlight code that triggered database queries in logs.
  config.active_record.verbose_query_logs = true

  # Highlight code that enqueued background job in logs.
  config.active_job.verbose_enqueue_logs = true

  # Suppress logger output for asset requests.
  config.assets.quiet = true

  # Raises error for missing translations.
  # config.i18n.raise_on_missing_translations = true

  # Annotate rendered view with file names.
  # config.action_view.annotate_rendered_view_with_filenames = true

  # Uncomment if you wish to allow Action Cable access from any origin.
  # config.action_cable.disable_request_forgery_protection = true

  # Raise error when a before_action's only/except options reference missing actions
  config.action_controller.raise_on_missing_callback_actions = true

  # デバイスのメール設定
  config.action_mailer.default_url_options = { host: 'localhost', port: 3000 }

end
「app\views\layouts\application.html.erb」ファイルのbodyタグに以下の記述を追加します。
<p class="notice"><%= notice %></p>
<p class="alert"><%= alert %></p>
記述追加 【app\views\layouts\application.html.erb】19行目
<!DOCTYPE html>
<html>
  <head>
    <title>GigHub7</title>
    <meta name="viewport" content="width=device-width,initial-scale=1">
    <%= csrf_meta_tags %>
    <%= csp_meta_tag %>

    <%= stylesheet_link_tag "application", "data-turbo-track": "reload" %>
    <%= javascript_importmap_tags %>
  </head>

  <body>

    <!-- device -->
    <p class="notice"><%= notice %></p>
    <p class="alert"><%= alert %></p>

    <%= yield %>
  </body>
</html>
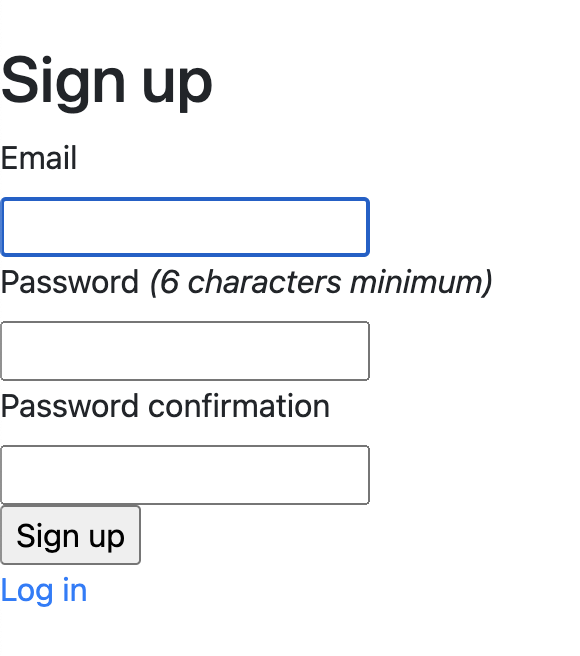
Webサーバーを起動して表示を確認してみます。
http://localhost:3000/users/sign_up
まだダサいですがサインアップは機能します。

サインアップしてみます。
メールアドレスとパスワードを2回入力し、「Sign_up」をクリックします。

Posticoでユーザー登録ができているか確認します。

【04 | Bootstrap5.3の利用】 << 【ホーム】 >> 【06 | ナビゲーションバーの利用】
↓↓クリックして頂けると励みになります。