[16 | 画像アップロード] << [ホーム] >> [18 | ホームページ]
Cloudinaryにサインアップします。
cloudinary.com

今回はデベロッパーを選択しました。

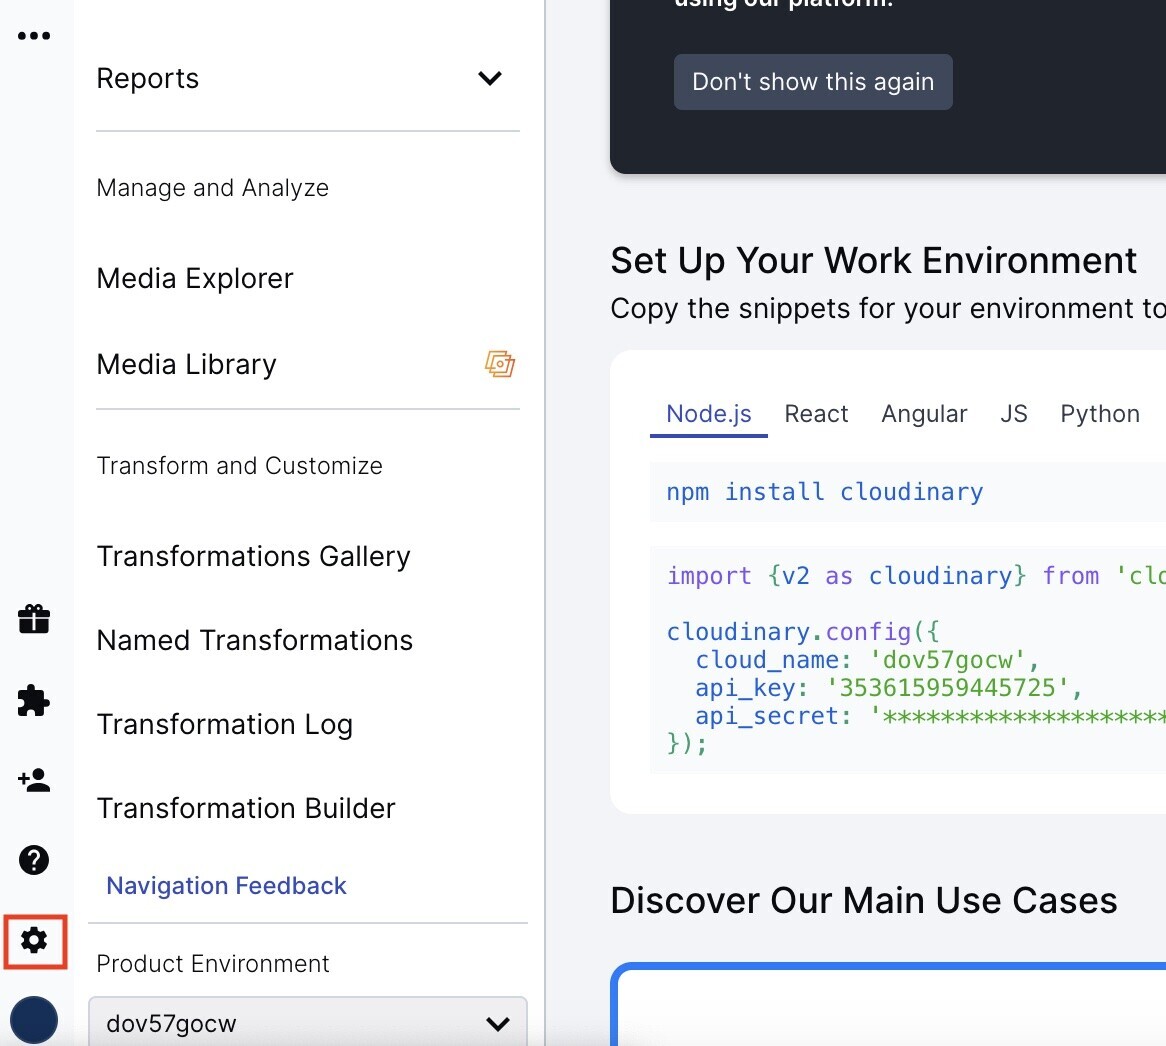
左下の歯車マーク「設定」をクリックします。
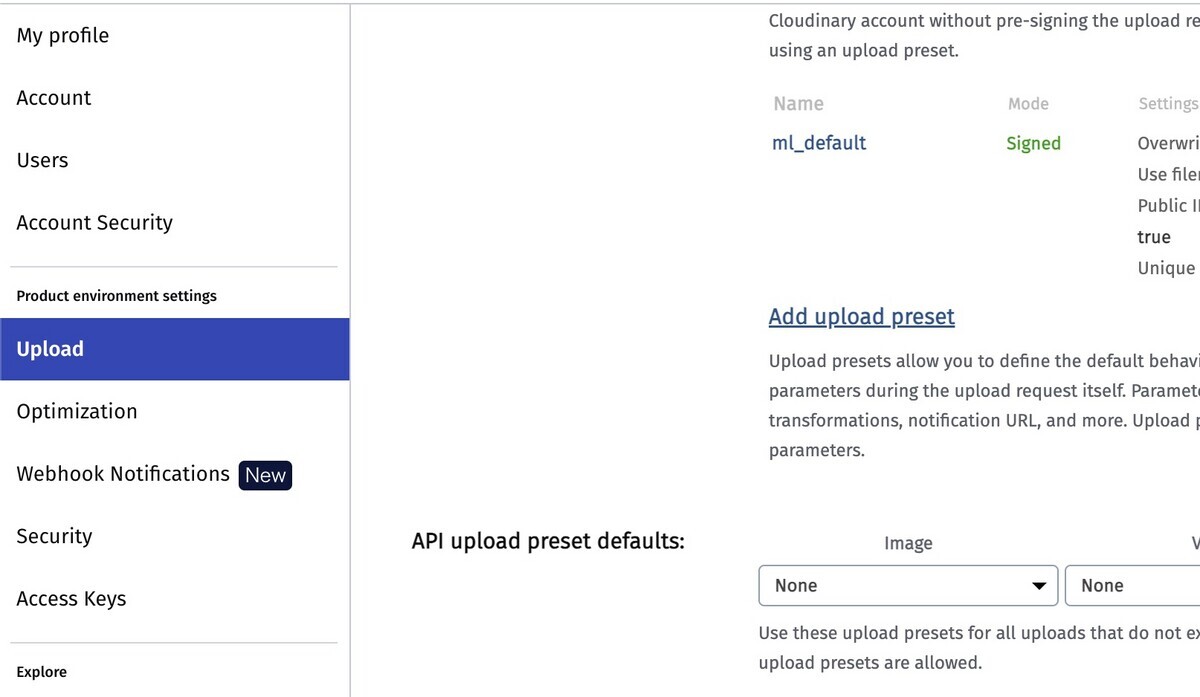
左メニュー「upload」の「Add upload preset」をクリックします。
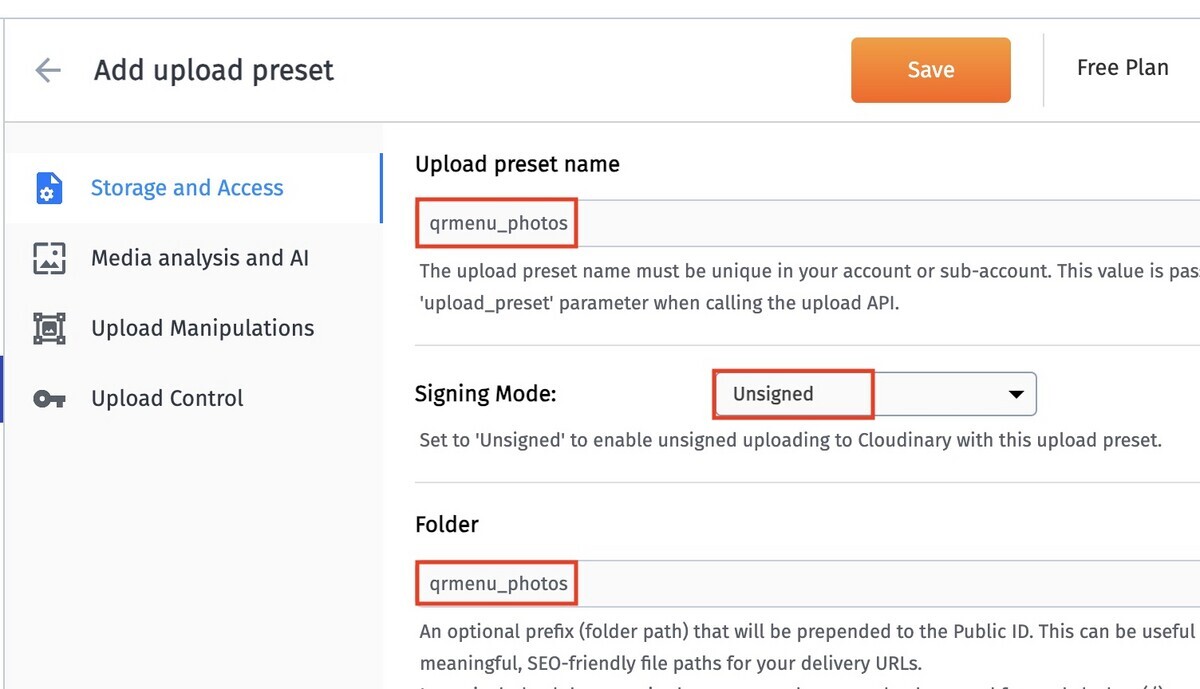
「Upload preset name」を「qrmenu_photos」に変更し、Signing Modeを「unsigned」に変更します。
Folderの名前も「qrmenu_photos」にします。
「Save」するとフォルダが作成されます。

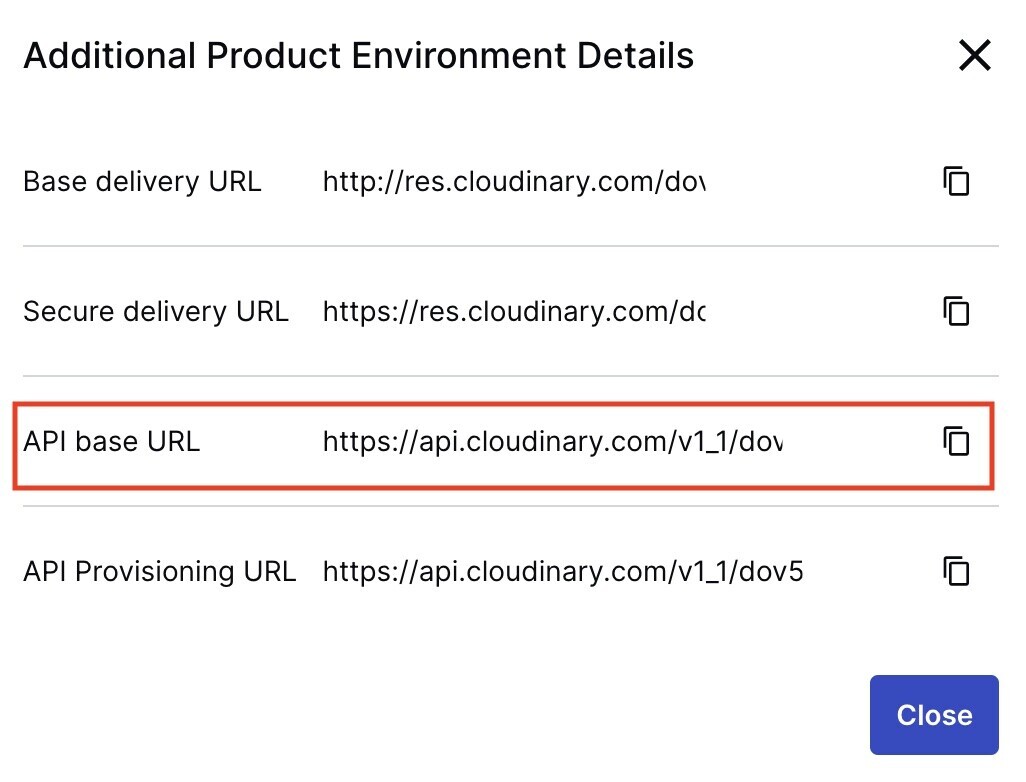
ダッシュボードの「API Environment variable」を開きます。

「API base URL」のアドレスをコピーします。
「qrmenu_react」を編集します。
「src/apis.js」ファイルを以下のように編集します。
75行目のfetchの部分にはご自分の「API base URL」を入力してください。
コピーするとfetch("https://api.cloudinary.com/v1_1/dov57XXX/image/upload"という感じになります。
記述編集 【Desktop/QRMenu/qrmenu_react/src/apis.js】
import { toast } from 'react-toastify';

function request(path,  {data = null, token = null, method = "GET" }) {
  return fetch(path, {
    method,
    headers: {
      Authorization: token ? `Token ${token}` : "",
      "Content-Type": "application/json",
    },
    body: method !=="GET" && method !== "DELETE" ? JSON.stringify(data): null,
  })
    .then((response) => {

      //もし成功したら
      if (response.ok) {
        if(method === "DELETE") {
          return true;
        }
        //toast.success("ログイン成功");
        return response.json();
      }
      //失敗
      return response.json().then((json) => {
          //JSONエラー
          if (response.status === 400) {
            toast.error("氏名もしくはパスワードに間違いがあります。");
            const errors = Object.keys(json).map(
                (k) => `${(json[k].join(" "))}`
            );
            throw new Error(errors.join(" "));
          }
          throw new Error(JSON.stringify(json));
        })
        .catch((e) => {
          if (e.name === "SyntaxError") {
            throw new Error(response.statusText);
          }
          throw new Error(e);
        })
    })

    .catch((e) => {
      //全エラー
      toast(e.message, { type: "error" });
    })
}

export function signIn(username, password) {
  return request("/auth/token/login/", {
    data: {username, password},
    method: "POST",
  })
}

export function register(username, password) {
  return request("/auth/users/", {
    data: {username, password},
    method: "POST",
  })
}

export function fetchPlaces(token) {
  return request("/api/places/", {token});
}

export function addPlace(data, token) {
  return request("/api/places/", {data, token, method: "POST" });
}

export function uploadImage(image) {
  const formData = new FormData();
  formData.append("file", image);
  formData.append("upload_preset", "qrmenu_photos");

  return fetch("ご自分のAPI base URLを入力してください/image/upload", {
    method: "POST",
    body: formData,
  }).then((response) => {
    return response.json();
  });
}
「react-dropzone」をインストールします。
コマンド
npm i react-dropzone@11.3.2 -s
「src/containers」フォルダに「ImageDropzone.js」ファイルを新規作成します。
新規作成 【src/containers/ImageDropzone.js】
import { Spinner } from 'react-bootstrap';
import { useDropzone } from 'react-dropzone';
import React, { useCallback, useState } from 'react';
import styled from 'styled-components';

import { uploadImage } from '../apis';

const Dropzone = styled.div`
    border: 1px dashed #ced4d9;
    border-radius: 5px;
    color: #6c757d;
    display: flex;
    align-items: center;
    justify-content: center;
    height: 142px;
    img {
        height: 140px;
    }
`;

function ImageDropzone({ value, onChange }) {
    const [loading, setLoading] = useState(false);

    const onDrop = useCallback((acceptedFiles) => {
        console.log(acceptedFiles);

        setLoading(true);
        uploadImage(acceptedFiles[0])
        .then((json) => onChange(json.url))
        .finally(() => setLoading(false));
    }, []);

    const {getRootProps, getInputProps} = useDropzone({
        onDrop,
        multiple: false,
        accept: 'image/*',
    })

    return (
      <Dropzone {...getRootProps()}>
        <input {...getInputProps()} />
        {
            value ? (
                <img src={value} />
            ) : loading ? (
                <Spinner variant="standard" animation="border" role="status" />
            ) : (
                <span>ファイルをドラック&ドロップするか、クリックしてファイルを選択してください。</span>
            )
        }
      </Dropzone>
    )
}

export default ImageDropzone;
「src/containers/PlaceForm.js」ファイルを編集します。
記述編集 【src/containers/PlaceForm.js】
import { Form, Button } from 'react-bootstrap';
import React, { useState, useContext } from 'react';

import { addPlace } from '../apis';
import AuthContext from '../contexts/AuthContext';

import ImageDropzone from './ImageDropzone';

const PlaceForm =({ onDone }) => {
    const [name, setName] = useState("");
    const [image, setImage] = useState("");

    const auth = useContext(AuthContext);

    const onClick = async () => {
        const json = await addPlace({ name, image }, auth.token)
        if(json) {
            setName("");
            setImage("");
            onDone();
        }
    }

    return (
        <div>
            <h4 classname="text-center">飲食店</h4>

            <Form.Group>
                      <Form.Label>飲食店名</Form.Label>
                      <Form.Control
                        type="text"
                        placeholder="飲食店名を入力"
                        value={name}
                        onChange={(e) => setName(e.target.value)}
                      />
            </Form.Group>

            <Form.Group>
                <Form.Label>画像</Form.Label>
                <ImageDropzone value={image} onChange={setImage} />
            </Form.Group>

            <Button variant="standard" block onClick={onClick}>
                登録
            </Button>

        </div>
    )

}

export default PlaceForm;
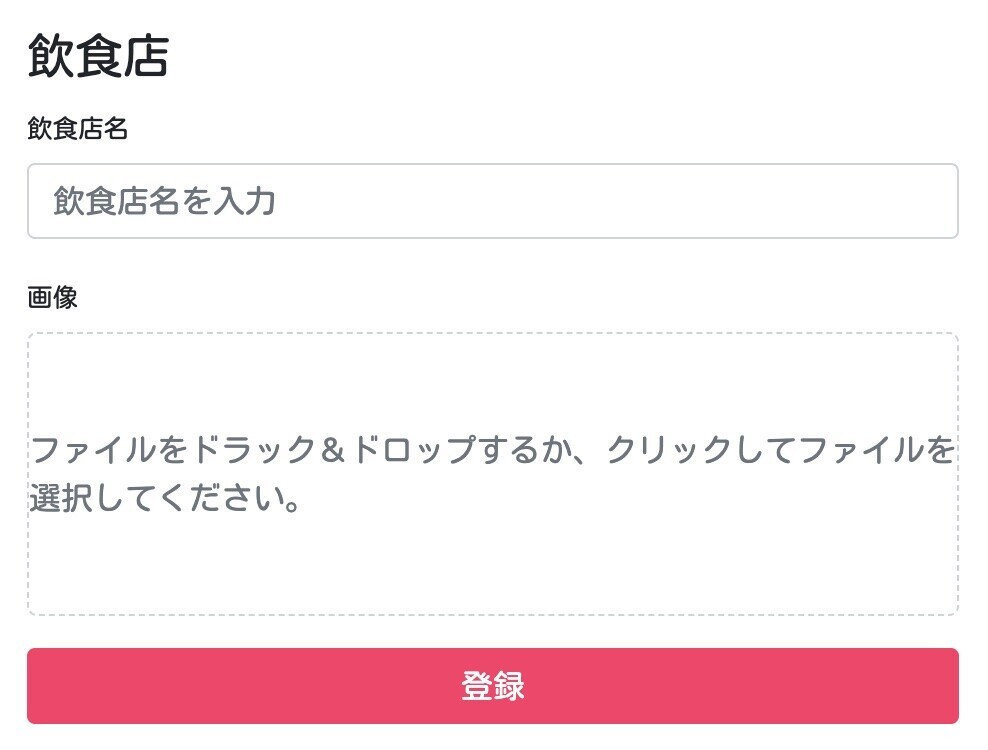
ブラウザを確認します。
これで画像がクラウドに保存できるようになりました。
動作を確認してください。
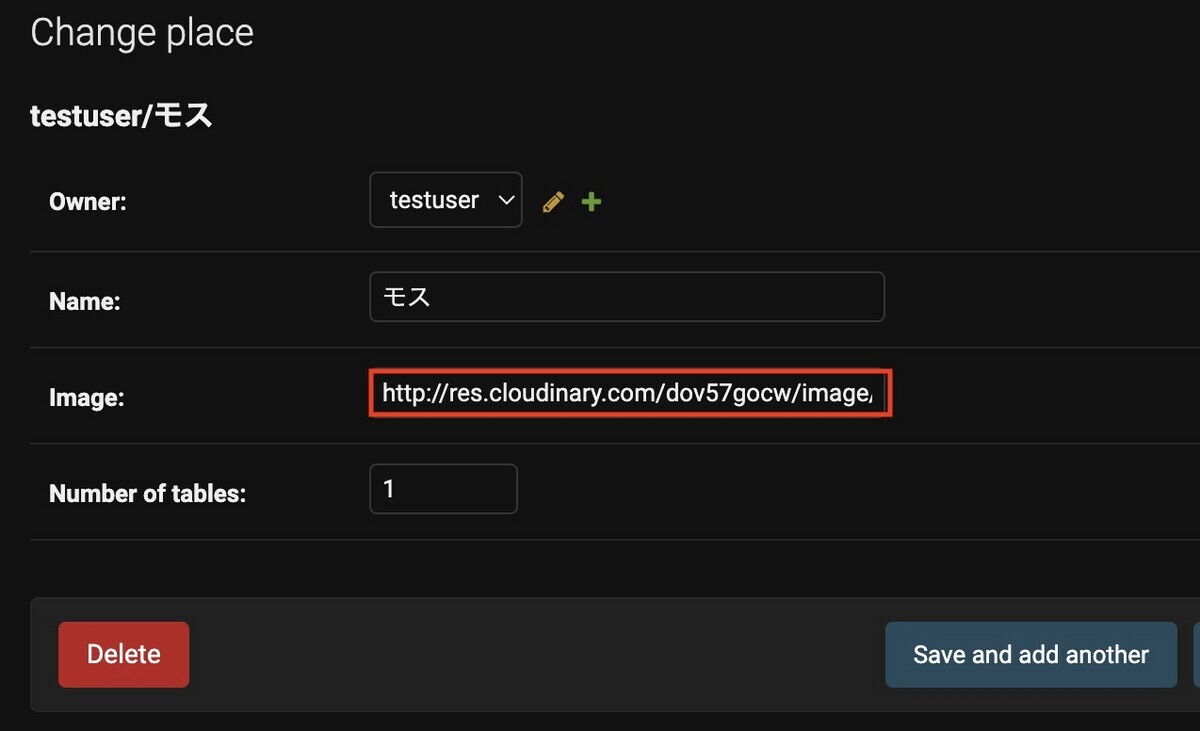
画像フィールドにCloudinaryのアドレスが入っていることを確認します。
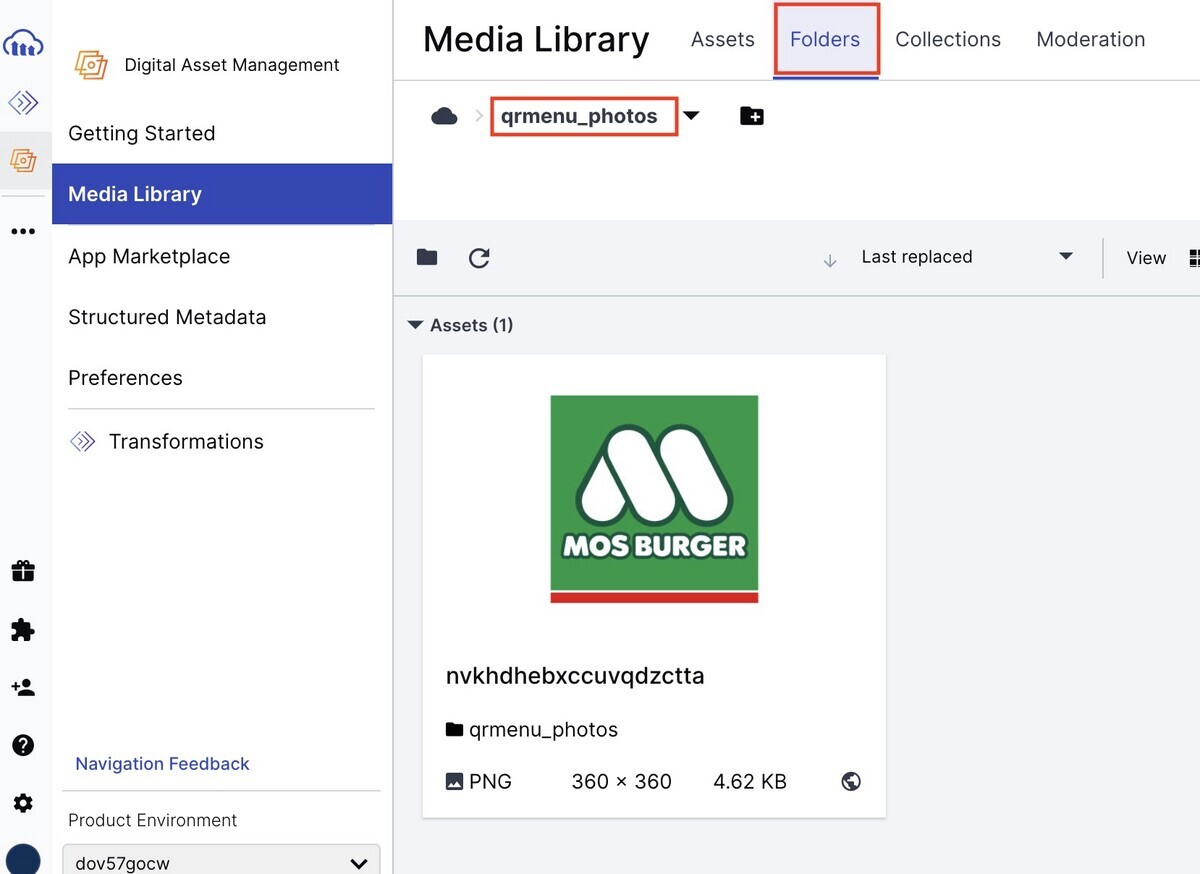
CloudinaryのMedia Libraryを確認すると、画像がアップロードされているのが確認できます。
↓↓クリックして頂けると励みになります。
[16 | 画像アップロード] << [ホーム] >> [18 | ホームページ]