Bulmaを使用できるようにします。
bulma.io
「GemFile」に以下の記述を追加します。
記述追加 GemFile(56行目)
gem 'bulma-rails', '~> 0.7.4'
gem 'bulma-extensions-rails', '~> 1.0.30'
GemFile
source 'https://rubygems.org'

git_source(:github) do |repo_name|
  repo_name = "#{repo_name}/#{repo_name}" unless repo_name.include?("/")
  "https://github.com/#{repo_name}.git"
end


# Bundle edge Rails instead: gem 'rails', github: 'rails/rails'
gem 'rails', '~> 5.0.7', '>= 5.0.7.1'
# Use postgresql as the database for Active Record
gem 'pg', '>= 0.18', '< 2.0'
# Use Puma as the app server
gem 'puma', '~> 3.0'
# Use SCSS for stylesheets
gem 'sass-rails', '~> 5.0'
# Use Uglifier as compressor for JavaScript assets
gem 'uglifier', '>= 1.3.0'
# Use CoffeeScript for .coffee assets and views
gem 'coffee-rails', '~> 4.2'
# See https://github.com/rails/execjs#readme for more supported runtimes
# gem 'therubyracer', platforms: :ruby

# Use jquery as the JavaScript library
gem 'jquery-rails'
# Turbolinks makes navigating your web application faster. Read more: https://github.com/turbolinks/turbolinks
gem 'turbolinks', '~> 5'
# Build JSON APIs with ease. Read more: https://github.com/rails/jbuilder
gem 'jbuilder', '~> 2.5'
# Use Redis adapter to run Action Cable in production
# gem 'redis', '~> 3.0'
# Use ActiveModel has_secure_password
# gem 'bcrypt', '~> 3.1.7'

# Use Capistrano for deployment
# gem 'capistrano-rails', group: :development

group :development, :test do
  # Call 'byebug' anywhere in the code to stop execution and get a debugger console
  gem 'byebug', platform: :mri
end

group :development do
  # Access an IRB console on exception pages or by using <%= console %> anywhere in the code.
  gem 'web-console', '>= 3.3.0'
  gem 'listen', '~> 3.0.5'
  # Spring speeds up development by keeping your application running in the background. Read more: https://github.com/rails/spring
  gem 'spring'
  gem 'spring-watcher-listen', '~> 2.0.0'
end

# Windows does not include zoneinfo files, so bundle the tzinfo-data gem
gem 'tzinfo-data', platforms: [:mingw, :mswin, :x64_mingw, :jruby]

# bulma
gem 'bulma-rails', '~> 0.7.4'
gem 'bulma-extensions-rails', '~> 1.0.30'
インストールします。
コマンド
bundle
「app\assets\stylesheets\application.css」ファイルを「application.scss」にリネームします。
拡張子に「s」がついています。
リネームした「app\assets\stylesheets\application.scss」ファイルに以下の記述を追加します。
記述追加 app\assets\stylesheets\application.scss(リネームしたファイル 17行目)
@import 'bulma';
@import 'bulma-extensions';
app\assets\stylesheets\application.scss
/*
 * This is a manifest file that'll be compiled into application.css, which will include all the files
 * listed below.
 *
 * Any CSS and SCSS file within this directory, lib/assets/stylesheets, vendor/assets/stylesheets,
 * or any plugin's vendor/assets/stylesheets directory can be referenced here using a relative path.
 *
 * You're free to add application-wide styles to this file and they'll appear at the bottom of the
 * compiled file so the styles you add here take precedence over styles defined in any other CSS/SCSS
 * files in this directory. Styles in this file should be added after the last require_* statement.
 * It is generally better to create a new file per style scope.
 *
 *= require_tree .
 *= require_self
 */

 @import 'bulma';
 @import 'bulma-extensions';
一度サーバを起動します。
コマンド
rails s
サーバが起動したらブラウザで「http://localhost:3000/」にアクセスします。
ナビゲーションバーを使用したページを作成していきます。
コマンド
rails g controller pages about
「app\views」フォルダに「shared」フォルダを新規作成してください。
作成した「shared」フォルダに「_navbar.html.erb」ファイルを新規作成して下さい。
app\views\shared\_navbar.html.erb(新規作成したファイル)
<nav class="navbar is-link" role="navigation" aria-label="main navigation">
    <div class="navbar-brand">
        <a class="navbar-item" href="/">
            <h1>テストサイトGakushuu</h1>
        </a>
        <a role="button" class="navbar-burger burger" aria-label="menu" aria-expanded="false" data-target="navbarBasicExample">
            <span aria-hidden="true"></span>
            <span aria-hidden="true"></span>
            <span aria-hidden="true"></span>
        </a>
    </div>

    <div id="navbarBasicExample" class="navbar-menu">
        <div class="navbar-end">
            <a class="navbar-item"></a>
            <a class="navbar-item"></a>
            <div class="navbar-item">
                <div class="buttons">
                    <a class="button is-info"><strong>新規ユーザ登録</strong></a>
                    <a class="button is-light">ログイン</a>
                </div>
            </div>

            <div class="navbar-item has-dropdown is-hoverable" style="margin-right: 100px;">
                <a class="navbar-item"></a>
                <div class="navbar-dropdown">
                    <a href="" class="navbar-item"></a>
                    <a href="" class="navbar-item"></a>
                    <hr class="navbar-divider">
                    <a href="" class="navbar-item">ログアウト</a>
                </div>
            </div>
        </div>
    </div>
</nav>

<script>
    $(document).ready(function() {
        // navbar burgerアイコンでクリックイベントを確認する
        $(".navbar-burger").click(function() {
            // 「navbar-burger」と「navbar-menu」の両方で「is-active」クラスを切り替える
            $(".navbar-burger").toggleClass("is-active");
            $(".navbar-menu").toggleClass("is-active");
        });
    });
</script>
「app\views\layouts\application.html.erb」ファイルに以下の記述を追加します。
記述追加 app\views\layouts\application.html.erb(13行目)
<%= render "shared/navbar" %>
app\views\layouts\application.html.erb
<!DOCTYPE html>
<html>
  <head>
    <title>Gakushuu</title>
    <%= csrf_meta_tags %>

    <%= stylesheet_link_tag    'application', media: 'all', 'data-turbolinks-track': 'reload' %>
    <%= javascript_include_tag 'application', 'data-turbolinks-track': 'reload' %>
  </head>

  <body>

    <%= render  "shared/navbar" %>

    <%= yield %>
  </body>
</html>
サーバを起動します。
コマンド
rails s
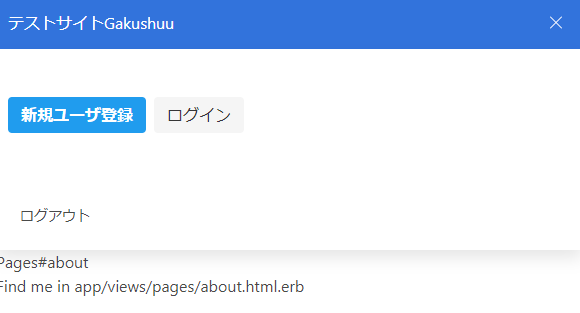
ブラウザ確認
http://localhost:3000/pages/about

ブラウザを縮小してスマートフォンでの表示を確認します。
右上にバーガーメニューがでます。
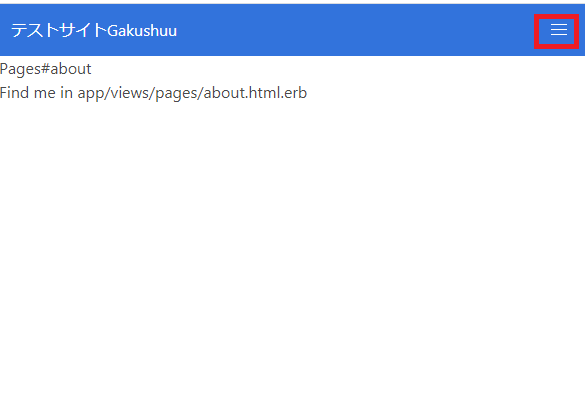
メニューを開いてみます。