<<前 [TOP] 次>>
これから作成するコントローラは商品を買い物出来るようにするもので、名前を「marketコントローラ」とします。
新しいコントローラをジェネレータで作成するにはコマンドプロンプトで「shop」フォルダの「bin」フォルダに移動して「rails generate controller Market index」と入力します。
この「marketコントローラ」には「index()」というアクションメソッドを持ちます。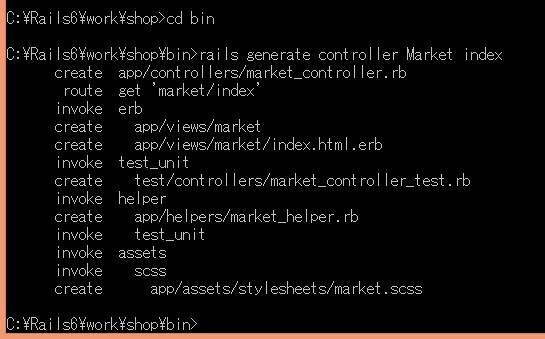
ブラウザで「http://localhost:3000/market/index」にアクセスして表示を確認してみます。
このアクションをWebサイトのrootのURLとして設定します。
それには「C:\Rails6\work\shop\config」フォルダの「routes.rb」ファイルを以下のように編集します。
【C:\Rails6\work\shop\config\routes.rb】
Rails.application.routes.draw do
  #get 'market/index'
  root 'market#index', as: 'market_index'
  resources :goods
  # For details on the DSL available within this file, see https://guides.rubyonrails.org/routing.html
end
「get 'market/index'」をコメントアウトすることで「http://localhost:3000/market/index」としてもアクセスできないようにしました。
「root 'market#index', as: 'market_index'」の記述を追加し、「http://localhost:3000/」でindexページにアクセスできるようにしました。
「as:」オプションにより「market_index_path」というメソッドが作成されます。
商品をリストとして表示させることから始めます。
それには商品のリストをデータベースから取り出し、テーブルを表示するビュー内のコードに渡す必要があります。
「C:\Rails6\work\shop\app\controllers」フォルダに作成された「market_controller.rb」ファイルを以下のように編集します。
【C:\Rails6\work\shop\app\controllers\market_controller.rb】
class MarketController < ApplicationController
  def index
	@goods = Good.order(:title)
  end
end
「order()」メソッドを使い、商品名(title)の降順で表示するようにしています。
次にビューのテンプレートを編集します。
「C:\Rails6\work\shop\app\views\market」フォルダの「index.html.erb」ファイルを以下のように編集します。
【C:\Rails6\work\shop\app\views\market\index.html.erb】
<% if notice %>
	<aside id="notice"><%= notice %></aside>
<% end %>

<h1>Railsはじめてマート 商品カタログ</h1>
<br>
<ul class="catalog">

	<% @goods.each do |good| %>

		<li>

			<%= image_tag(good.image_url, width: 140) %>
			<h2><%= good.title %></h2>
			<p><%= sanitize(good.description) %></p>
			<div class="price"><%= (good.price).to_i %>円</div>

		</li>

	<% end %>

</ul>
ブラウザで「http://localhost:3000/」にアクセスして確認します。
続いてスタイルシートを編集します。
「C:\Rails6\work\shop\app\assets\stylesheets」フォルダにある「market.scss」ファイルを以下のように編集します。
【C:\Rails6\work\shop\app\assets\stylesheets\market.scss】
// Place all the styles related to the Market controller here.
// They will automatically be included in application.css.
// You can use Sass (SCSS) here: https://sass-lang.com/

.market {
	max-width: 80em;
	ul.catalog {
		border-top: solid 0.250em;
		list-style : none;
		padding: 0;
		margin: 0;
		li {
			padding: 0;
			margin: 0;
			border-bottom: solid thin #ddd;

			&::after {
				clear: both;
				content: " ";
				display: block;
			}

			img {
				float: left;
				padding: 1em;
				margin-right: 1em;
				margin-bottom: 1em;
				box-shadow: 0.176em 0.176em 0.354em 0px rgba(0,0,0,0.75);

			}
			.price {
				font-size: 1.414em;
			}
		}
	}
}
ブラウザで「http://localhost:3000/」にアクセスして確認します。
ページにレイアウトを追加します。
「C:\Rails6\work\shop\app\views\layouts」フォルダにある「application.html.erb」ファイルを編集すると別途レイアウトを指定しないすべてのビューで適用されます。
「logo.png」は「C:\Rails6\work\shop\app\assets\images」フォルダに保存します。
【C:\Rails6\work\shop\app\views\layouts\application.html.erb】
<!DOCTYPE html>
<html>
  <head>
    <title>Railsはじめてマート オンラインストア</title>
    <%= csrf_meta_tags %>
    <%= csp_meta_tag %>

    <%= stylesheet_link_tag 'application', media: 'all', 'data-turbolinks-track': 'reload' %>
    <%= javascript_pack_tag 'application', 'data-turbolinks-track': 'reload' %>
  </head>

  <body>
	<header class="main">
		<%= image_tag 'logo.png', alt: 'Railsはじめてマート' %>
	</header>
	<section class="content">
		<nav class="side_nav">
			<ul>
				<li><a href="/">ホーム</a></li>
				<li><a href="/questions">質問</a></li>
				<li><a href="/news">ニュース</a></li>
				<li><a href="/contact">問い合わせ</a></li>
			</ul>
		</nav>
		<main class='<%= controller.controller_name %>'>
		    <%= yield %>
		</main>

	</section>
  </body>
</html>
あわせてスタイルシートも編集します。
「C:\Rails6\work\shop\app\assets\stylesheets」フォルダにある「application.css」ファイルを編集すると別途CSSを指定しないすべてのビューで適用されます。
【C:\Rails6\work\shop\app\assets\stylesheets\application.css】
/*
 * This is a manifest file that'll be compiled into application.css, which will include all the files
 * listed below.
 *
 * Any CSS and SCSS file within this directory, lib/assets/stylesheets, or any plugin's
 * vendor/assets/stylesheets directory can be referenced here using a relative path.
 *
 * You're free to add application-wide styles to this file and they'll appear at the bottom of the
 * compiled file so the styles you add here take precedence over styles defined in any other CSS/SCSS
 * files in this directory. Styles in this file should be added after the last require_* statement.
 * It is generally better to create a new file per style scope.
 *
 *= require_tree .
 *= require_self
 */

body {
	margin: 0;
	padding: 0;

}

header.main {
	text-align: left;
	background: #EAD9FF;
	margin: 0;
}


.content {
	margin: 0;
	padding: 0;

	display: flex;
}

nav {
	padding-bottom; 1em;
	background: #D0B0FF;
	text-align: left;
	padding: 1em;
}

ul {
	list-style: none;
	margin: 0;
	padding: 0;
	padding-right: 5em;
}

li {
	margin: 0;
	padding: 0.5em;
	letter-spacing: 0.354em;
}


a {
	color: #5507FF;
	text-decoration: none;
}

a:hover {
	background: none;
	color: white;
}

main {
	padding: 1.5em;
}
ブラウザで「http://localhost:3000/」にアクセスして確認してみます。
↓↓クリックして頂けると励みになります。